
Unraid to Remote Unraid Backup Server with Wireguard and RSYNC
/In this guide we will backing up Unraid to another Unraid server using rsync. While the steps to make this happen may seem daunting, they are actually very simple and mostly painless! Let’s bash our brains!
The Setup
Let’s start with an example diagram to help us picture what is happening between both servers. As you will see, both servers have Wireguard installed and are able to communicate directly with each other as if they are on the same network.

Guide
Setup the Local Server (Site A)
Using the Community Apps Plugin, go ahead and search, download, and install the Dynamix WireGuard app.
Once it is installed you can now configure Wireguard by clicking the tab Settings -> VPN Manager
Now you will want to Add Tunnel
Local Name: SiteA , you can name it whatever you want.
Click the Generate Keypair button
Local Tunnel Network Pool should not be the same as your current subnet. As in, if you current server IP address is 192.168.#.#, then let the subnet be 10.#.#.#. This will prevent routing issues later on.
Give your Site A Unraid server an IP address, Local Tunnel Address: 10.253.0.1
Local Endpoint is your WAN IP, you can find this by Google Searching, “What Is My IP”
You can change the default port to whatever port you want.
I chose to not use NAT
Add Peer
Peer Name: SiteB
Click the Generate Keypair button
Peer type of access: Server to Server Access
Peer Tunnel Address: 10.253.0.2 , This will be the address given to your remote server
Peer Endpoint: WAN IP for Remote Server aka SiteB
Peer Allowed IPs: 10.253.0.2 , You can specify more IPs as needed, I chose to just allow the single remote server access to my local server
Apply.
Click the “Eye” Icon next to the SiteB Peer and download the WireGuard Configuration you just created. We will import this configuration on to SiteB to make our lives a bit easier.

Setup the Remote Server (Site B)
The easiest way to set up SiteB is to import the peer-siteA-wg0-1.conf file that was generated in step 16 above. Simply click the Import Tunnel button near the top right hand corner of the WebUI and you will be done from here. After importing your Tunnel should look similar to this. As you can see SiteB is essentially in reverse order of SiteA. Please note, that a zip file will be generated and you will need to extract the file in order to get the “peer-siteA-wg0-1.conf” file that needs to be imported.

Port Forwarding
You will need to port forward UDP Port 51820 on your router at Site A and Site B for this to work. If you changed the default port, then make sure you port forward that UDP port. Unfortunately due to the vast number of routers in existence, I cannot show you how to do this on your router, you will need to Google search this. However, I have provided an example of my AT&T Router at home.

Test our Settings
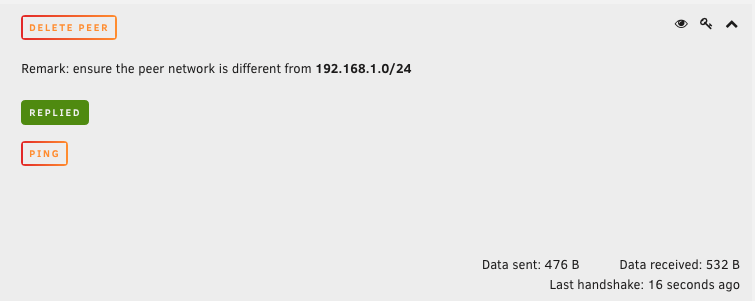
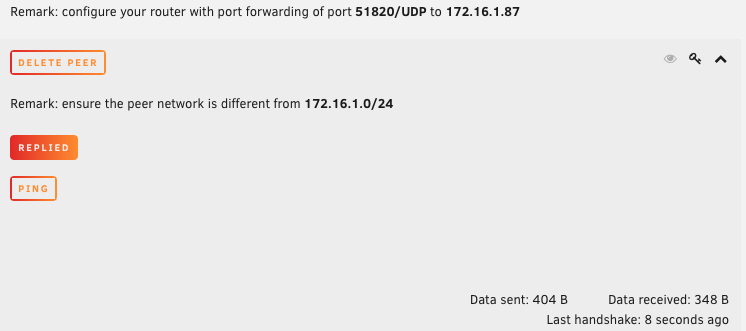
After making all of the changes to both servers, all that is left to do is “Activate” the Tunnels on both ends. It will take several seconds for the servers to start communicating so you will need to have some patience. If you are unsure if the Handshake is active we can test our connection by pressing the “Ping” button next to Peer Tunnel Address. This will attempt to ping the peer server directly and listen for a response. If you did everything correctly you will see this. The picture on the left is SiteA pinging SiteB. The picture on the right is SiteB pinging SiteA.
Setting up SiteA and SiteB for RSYNC
Okay, not so bad right? Now for the slightly more complex part. It will look awful but I promise it’s not hard. So now that our two servers are able to ping each other, it’s time to prepare our servers to be able to automatically communicate without manual intervention. From this point, you should be able to do everything from your home/local/SiteA server. A couple things to remember from the examples provided for later on:
SiteA IP Address is 10.253.0.1
SiteB IP Address is 10.253.0.2
Okay just a couple more points to make. By default the directory /root/.ssh does not exist. Furthermore, the file authorized_keys does not exist by default. So, I have to add some extra steps in here for everyone’s convenience because neither the directory or file exist.
Setting up SiteA
Okay here we go, first we need to open a Terminal window, in the top right corner of the Unraid WebUI press the Icon that looks like this >_

Okay from here we just need to execute a few commands and we will jacked up and good to go.
First we need to generate a public/private key pair to allow an SSH connection to work without a password and without manual intervention. To do this simply do the following command on SiteA.
ssh-keygen -t rsa -b 2048 -f /root/.ssh/siteA-rsync-keyYou will be prompted to “Enter a Passphrase”. Just hit the ‘Enter’ key twice. Deep breath.
cp /root/.ssh/* /boot/config/ssh/printf "#Copies all files needed for authorized ssh connections \nmkdir /root/.ssh \ncp /boot/config/ssh/* /root/.ssh/ \ncd /root/.ssh \nchmod 600 * \n" >> /boot/config/go
Second we need to give the key we just generated to SiteB so it knows that SiteA is allowed access. siteA-rsync-key.pub is not a typo, two files will be created from the command above. You need to copy over the public key only.
scp /root/.ssh/siteA-rsync-key.pub root@10.253.0.2:/root/Great work, take another breath. Grab a beer we are halfway done. Do not close the terminal WebUI yet, you need it for the next section.
Setting up SiteB
Third, now we will remotely access SiteB so it can use SiteA’s public key.
ssh root@10.253.0.2Okay, we are now within SiteB, execute the following commands and we are golden baby!
if [ ! -d .ssh ]; then mkdir .ssh ; chmod 700 .ssh ; fimv siteA-rsync-key.pub .ssh/cd .ssh/ ; if [ ! -f authorized_keys ]; then touch authorized_keys; chmod 644 authorized_keys; fichmod 600 siteA-rsync-key.pub ; cat siteA-rsync-key.pub >> authorized_keyscp /root/.ssh/* /boot/config/ssh/printf "#Copies all files needed for authorized ssh connections \nmkdir /root/.ssh \ncp /boot/config/ssh/* /root/.ssh/ \ncd /root/.ssh/ \nchmod 600 * \n" >> /boot/config/goDo not close the terminal WebUI yet, you need it for the next section. Type: exit
Running RSYNC
Okay, presumably you have done everything correctly thus far. Now we can backup SiteA to SiteB. If you closed the terminal webUI after the previous section, you will need to open it again.
The following command will synchronize files between both SiteA and SiteB servers. In my opinion it is best to have matching Share names to make copying files super easy
Example 1
This command copies a share named “Downloads” found on SiteA to a share also named “Downloads” found on SiteB
rsync -avz -e "ssh -i /root/.ssh/siteA-rsync-key" /mnt/user/Downloads/ root@10.253.0.2:/mnt/user/Downloads/Example 2
This command copies files from SiteB to SiteA, both have matching share names
rsync -avz -e "ssh -i /root/.ssh/siteA-rsync-key" root@10.253.0.2:/mnt/user/homework/isos/ /mnt/user/homework/isos/Example 3
Copy a full disk and give me some feedback!
rsync -avu --numeric-ids --progress -e "ssh -i /root/.ssh/siteA-rsync-key -T -o Compression=no -x " /mnt/disk1/ root@10.253.0.2:/mnt/disk1/Congratulations, you have successfully setup a VPN to and from remote servers and used RSYNC to back up your data. I’m so proud of you!
Advanced User Course
That’s cool and all but how do I make this work if my root/user have a password? Because, even with the keys setup, I still get prompted for a password. Well my friend, look no further. Simply do the following on both servers.
edit /etc/ssh/sshd_config
set/change/modify“PasswordAuthentication no”
save your changes
restart the ssh daemon with this command: /etc/rc.d/rc.sshd restart
Manually running these commands every time you remember to back your data up is for chumps and you are no chump, don’t nobody have time to manually rsync. So, how do you schedule all of this stuff? Well, thankfully, it’s pretty easy.
You will need to install User Scripts from Community Apps
No more hand holding. The Gloves have come off.
Use User Scripts to Schedule Backups
User Scripts can be found clicking the Plugin tab -> User Scripts. We will basically want to Add New Script and change my example to match your setup at home. Or Customize my example to however you operate.

Use the Firefox Container
Food for thought on this one. Mainly because I am tired from writing. One thing to consider doing is using Firefox within your SiteA container to access your SiteB server. Why? Well, this way you can access the Unraid WebUI through one browser without having to remotely connect to SiteB with your laptop/computer/workstation just to make some changes. To accomplish this do the following.
Download and configure OpenVPN on SiteB
Download DelugeVPN and allow it to act as a proxy for other containers
Download the Firefox container and force it to use DelugeVPN, then you can access your remote Unraid server through your local Unraid server. It will look like this!

The big take away here is, SpaceInvader One makes a video about setting this up. The hardest part is setting up OpenVPN on the remote server. Through some sort of magic Firefox is able to use DelugeVPN to access the remote server. Which, in my opinion is nice to have.
Install OpenVPN at SiteB
As an alternative to using the Firefox container, you could just simply install OpenVPN and connect to it from any computer with OpenVPN on it. Now my recommendation would be to go ahead and install OpenVPN along side Wireguard. This way you have two ways to connect to the server just in case something goes wrong. Furthermore, you are going to also want to create another Peer for that same laptop/workstation in Wireguard, that is different than the one you are using for server to server access. The reason why I recommend this is really for healthy cyber use. Last thing you want to do is mess something up between your two servers while they are synchronizing.
Hardware
In order to make this write up happen I used a few different servers. One of which isn’t listed below but the hardware is near identical to PNAS; that server is in Maine. If you are new to Unraid and prospecting this guide for ideas, then maybe all the hardware listed below will help you get an idea of all of the different hardware choices you can make. If you are looking to setup a remote server and don’t want to build a custom one, then check out a used Dell T320. Great price and great options.
My Local Server
Ryzen 3700x - $294.00
Corsair LPX 32GB (2x16GB) 3200MHz C16 (CMK32GX4M2B3200C16) - $139.99
EVGA SuperNova G2 750w (overkill but got it for a steal) - $95.00
Asus Hyper M.2 x16 - $60
3x Toshiba thnsn51t02duk 1TB NVME - $150 each
WD Red Drives 4TB x 4 - $250
Intel x540 T2 - $100
Quadro P600 - $100
Rosewill RSV-L4500 - $81
NavePoint Rails - $19.99
Eaton 5PX1000RT UPS- $250
iStarUSA 15U Rack - $150

My Local Test Server (PNAS)
AsRock EP2C602-4L/D16 ($280)
Dual LGA 2011 2690’s (eBay $350)
4GB Kingston ECC KVR1333D3E9S/4G (x16 $250 total)
Noctua NH-D9DX i4 3U (x2 $55)
Rosewill RSV-L4500 ($81)
NavePoint Rails ($25)
3.5 Hot-swap Drive Bays ($50)
6" SATA 15-Pin Male to Dual 4-Pin Molex Female Y Splitter (x3 $4)
SAS9211-8I ($82)
SFF-8087 to SATA Forward Breakout (x2 $12 each)
EVGA SuperNOVA 750 G2 ($120)
SanDisk Ultra Fit 16GB for unRAID OS ($6)
Toshiba thnsn51t02duk 1TB NVME ($150)
Asus Hyper M.2 x16 ($60)
Intel x540 T2 ($100)
WD Red Drives
Noctua NF-A9 PWM (x2 $15 each)
Be Quiet! 120mm PWM ($19)
iStarUSA 15u Server Rack ($150)


Conclusion
Man this was one heck of a write up. Personally I found it was much easier to do this simply by setting up VPN access on the remote server first. I actually setup OpenVPN first instead of going right for WireGuard. The reason? I didnt’ feel confident enough, that when playing around with Wireguard that I would lose my connection then have to drive to Florida from Alabama or walk a friend through some troubleshooting steps. It was too risky for my blood. Plus now, I have two different(technically 3) ways to access my remote server.
Why two Unraid servers?
Well believe it or not, I actually run a Minecraft server on the server in Florida. I also run a Minecraft server locally. But both servers are for different friend groups. I could have used a Synology NAS or a similar product but I’m already deeply familiar with Unraid and I wanted a server with a bit more power to do more things with. Also, of course if I decide I need a less powerful system I could just downgrade hardware with ease and of course vice versa.