
Unraid 6.9 OBS Capture, Encoding, and Twitch or YouTube Streaming Server
/This is the updated 2021 guide for setting up an OBS NDI container in Unraid 6.9. This the perfect lightweight solution over using a virtual machine or a dedicated PC. Get more out of your Unraid server with those left over system resources! Let’s get started.
Versions
Unraid: 6.9.1 2021-03-08
Community Apps: 2021.03.12
Ich777 NVIDIA-Plugin: 2021.03.19
Nvidia Driver: 460.67
What is NDI?
NDI is a plugin that allows you to capture audio and video from a device and output that data to the network. A second system can then capture that audio and video output and transcode it to be sent off to some other streaming service like Twitch. This can all be done over your local network. No capture cards needed.
Basic Diagram
Here is very simple diagram with a visual representation of how this all works. Essentially you are sending un-encoded video over the local network (using NDI) to your OBS container. Your OBS container then captures this video where then you can use a GPU or CPU to encode the video and send it off to Twitch or YouTube. The Unraid server will do all of the encoding instead of your gaming computer thus allowing you to have the near to maximum gaming performance. All of this is accomplished without the need of a capture card!

Guide
This guide assumes you have already installed the Community Apps plugin and have enabled “Enable additional search results from dockerHub:”. In short you can do this by going to Apps -> Settings -> Yes -> Apply.
Install and Configure the obs-ndi container
Download and install Daedilus1 docker obs container
When allowed to edit the container modify the following items
Set the Network type to custom: br0
Assign it a useful IP
Click the Advanced View button in the top right corner
In the WebUI: section add http://[IP]:[PORT:5901]
Click Apply
Your configuration should look like this when you are done.
Finally you can go ahead and connect to the container with VNC in the WebUI. The password is 123456. It should look like this after you connect to it. Right Clicking on the Desktop will reveal OBS in Ubuntu.
Setup NDI on both Machines
This guide also assumes you have already downloaded and installed the NDI plugin for OBS Project.
On your gaming PC go to Tools -> NDI Output Settings -> Check mark the box for “Main Output”. It looks like this.
Now on your Unraid inside the container you just need to add the NDI Source to the Sources box. The source name should be the hostname of your gaming PC, in this case my gaming pc is named “Queenbootywhomp”.
Success!
From here you can play around with the settings as you see fit. As you saw above it is already working. So pretty easy.
While streaming to YouTube, this is how much CPU and RAM is being used for a 1920x1080p stream at 60FPS. You will definitely want to tweak your settings in accordance with your hardware.
Nvidia NVENC Encoding
Well all of that stuff above is cool in all but how the heck do I use NVENC for my Youtube or Twitch stream instead???? I do after all have a spare Quadro or GeForce laying around. Well it’s pretty simple now.
In Community Apps search for Nvidia Driver
Download and install Ich777 Nvidia Driver
Reboot
After waiting patiently go to Plugins -> Nvidia Driver
You will see that the plugin has automatically downloaded the driver for your graphics card. You will need to copy your GPU key from here. It should look like this picture below.
Awesome now that you have that copied we will need to go back to our container and add the two following Variables and the Extra Parameter.
Nvidia_visible_devices
Nvidia_Driver_Capabilities

Extra Parameters
Finally all you need to do is add “—runtime=nvidia” to the extra parameters line and we are done. Your configuration should look similar to the one below.

Check OBS for NVENC
Okay time to make OBS use NVENC. Very easy stuff.


In the picture above, I am running the command “watch nvidia-smi” to see if the Quadro P600 is actually being used. As soon as you hit record or start stream “No running processes found” goes away but is not replaced with any PID or name. Could be a bug.
See it in action!
Troubleshooting
My NDI source is blank! The NDI version of both the gaming pc and the container must be the same for this to work. If the NDI versions are different then there will be no Source. You can also try rebooting both machines, that helped me a couple of times.
I did not run into any other bugs.
Odd OBS/NVIDIA Behavior
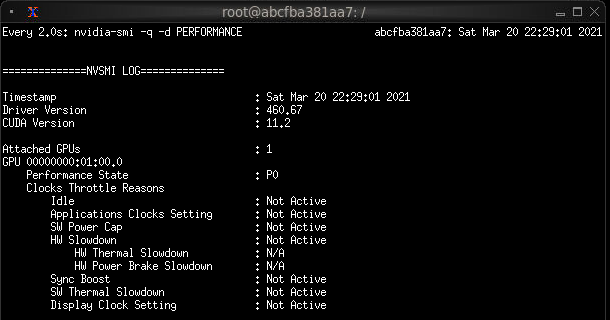
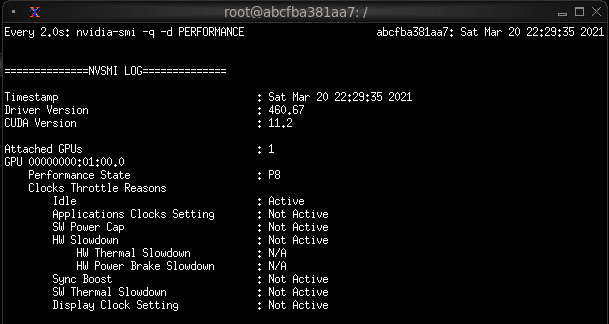
For some odd reason OBS is still using a lot of CPU resources even though NVENC is set. nvidia-smi also no longer reports OBS as a process. However, the only time the Quadro seems to be doing something is when I am recording or streaming. As seen below. This first screenshot shows that the K420 is actively idling. Then as soon as I hit Start Recording the idle state changes to Not Active, meaning the GPU is being used.
Also given my system stats, it’s hard to confirm that NVIDIA is actually doing anything because the CPU is always highly active during a stream.
Other Features
Can I record locally?
Yes you can. I’d also recommend setting a recording path in the container to something like /video. Then in Unraid setting up a Container Path of /Video to a Host Path of something like /mnt/cache/obs-ndi/video.
Third Party Applications
List of 3rd party applications this setup does not work with. I may add more based off comments or other findings in the future.
NDI HX Camera - most likely a NDI compatibility issue.
SLOBS - To my knowledge SLOBS only receives NDI Output, as in, you can only add an incoming source not broadcast. Also, as far as I know SLOBS is not linux compatible. Such a shame. Please note I have not tested the following and it is mere speculation on my part.
You could get “crazy” with your set up and do OBS -> docker-obs-ndi -> nginx-rtmp-docker -> SLOBS VM -> Twitch/YouTube/Mixer/etc
Or maybe even OBS -> docker-obs-ndi -> SLOBS VM -> Twitch/Youtube/Mixer/etc
Networking
This is more a word of caution than anything else. With this type of setup you could be over taxing or over loading your network equipment, meaning other people who are trying to use the network may experience a dropped connection or degraded quality. But it really depends on how your network is configured and what type of equipment you have at home.
All of these tests and previous tests were done using Ubiquiti equipment, which is considered to be pro-sumer/business/enterprise equipment, which tends to mean that it is more than capable of handling this type of streaming setup and more without issue.
Conclusion
I don’t think there would be much of quality difference between GPUs, I’d recommend sticking to newer GPU’s however. Pascal and newer. In the past I have used K4000’s and the P600 and didn’t notice any differences. GTX 1060 or newer would also perform plenty well. I think that’s all I got for now.